Following files/dirs are required for traditional Linux user management:
* /etc/passwd - contains various pieces of information for each user account
* /etc/shadow - contains the encrypted password information for user's accounts and optional the password aging information.
* /etc/group - defines the groups to which users belong
* /etc/gshadow - group shadow file (contains the encrypted password for group)
* /var/spool/mail - Generally user emails are stored here.
* /home - All Users data is stored here.
You need to backup all of the above files and directories from old server to new Linux server.
Commands to type on old Linux system
First create a tar ball of old uses (old Linux system). Create a directory:
# mkdir /root/move/
Setup UID filter limit:
# export UGIDLIMIT=500
Now copy /etc/passwd accounts to /root/move/passwd.mig using awk to filter out system account (i.e. only copy user accounts)
# awk -v LIMIT=$UGIDLIMIT -F: '($3>=LIMIT) && ($3!=65534)' /etc/passwd > /root/move/passwd.mig
Copy /etc/group file:
# awk -v LIMIT=$UGIDLIMIT -F: '($3>=LIMIT) && ($3!=65534)' /etc/group > /root/move/group.mig
Copy /etc/shadow file:
# awk -v LIMIT=$UGIDLIMIT -F: '($3>=LIMIT) && ($3!=65534) {print $1}' /etc/passwd | tee - |egrep -f - /etc/shadow > /root/move/shadow.mig
Copy /etc/gshadow (rarely used):
# cp /etc/gshadow /root/move/gshadow.mig
Make a backup of /home and /var/spool/mail dirs:
# tar -zcvpf /root/move/home.tar.gz /home
# tar -zcvpf /root/move/mail.tar.gz /var/spool/mail
Where,
* Users that are added to the Linux system always start with UID and GID values of as specified by Linux distribution or set by admin. Limits according to different Linux distro:
o RHEL/CentOS/Fedora Core : Default is 500 and upper limit is 65534 (/etc/libuser.conf).
o Debian and Ubuntu Linux : Default is 1000 and upper limit is 29999 (/etc/adduser.conf).
* You should never ever create any new system user accounts on the newly installed Cent OS Linux. So above awk command filter out UID according to Linux distro.
* export UGIDLIMIT=500 - setup UID start limit for normal user account. Set this value as per your Linux distro.
* awk -v LIMIT=$UGIDLIMIT -F: '($3>=LIMIT) && ($3!=65534)' /etc/passwd > /root/move/passwd.mig - You need to pass UGIDLIMIT variable to awk using -v option (it assigns value of shell variable UGIDLIMIT to awk program variable LIMIT). Option -F: sets the field separator to : . Finally awk read each line from /etc/passwd, filter out system accounts and generates new file /root/move/passwd.mig. Same logic is applies to rest of awk command.
* tar -zcvpf /root/move/home.tar.gz /home - Make a backup of users /home dir
* tar -zcvpf /root/move/mail.tar.gz /var/spool/mail - Make a backup of users mail dir
Use scp or usb pen or tape to copy /root/move to a new Linux system.
# scp -r /root/move/* user@new.linuxserver.com:/path/to/location
Commands to type on new Linux system
First, make a backup of current users and passwords:
# mkdir /root/newsusers.bak
# cp /etc/passwd /etc/shadow /etc/group /etc/gshadow /root/newsusers.bak
Now restore passwd and other files in /etc/
# cd /path/to/location
# cat passwd.mig >> /etc/passwd
# cat group.mig >> /etc/group
# cat shadow.mig >> /etc/shadow
# /bin/cp gshadow.mig /etc/gshadow
Please note that you must use >> (append) and not > (create) shell redirection.
Now copy and extract home.tar.gz to new server /home
# cd /
# tar -zxvf /path/to/location/home.tar.gz
Now copy and extract mail.tar.gz (Mails) to new server /var/spool/mail
# cd /
# tar -zxvf /path/to/location/mail.tar.gz
Now reboot system; when the Linux comes back, your user accounts will work as they did before on old system:
# reboot
Please note that if you are new to Linux perform above commands in a sandbox environment. Above technique can be used to UNIX to UNIX OR UNIX to Linux account migration. You need to make couple of changes but overall the concept remains the same.
Wednesday, February 24, 2010


Friday, December 11, 2009
Creating a Swap File
To add a swap file:
-
Determine the size of the new swap file in megabytes and multiply by 1024 to determine the number of blocks. For example, the block size of a 64 MB swap file is 65536.
-
At a shell prompt as root, type the following command with
countbeing equal to the desired block size:dd if=/dev/zero of=/swapfile bs=1024 count=65536 -
Setup the swap file with the command:
mkswap /swapfile -
To enable the swap file immediately but not automatically at boot time:
swapon /swapfile -
To enable it at boot time, edit
/etc/fstabto include the following entry:/swapfile swap swap defaults 0 0
The next time the system boots, it enables the new swap file.
-
After adding the new swap file and enabling it, verify it is enabled by viewing the output of the command
cat /proc/swapsorfree.
Extending Swap on an LVM2 Logical Volume
To extend an LVM2 swap logical volume (assuming /dev/VolGroup00/LogVol01 is the volume you want to extend):
1. Disable swapping for the associated logical volume:
# swapoff -v /dev/VolGroup00/LogVol01
2. Resize the LVM2 logical volume by 256 MB:
# lvm lvresize /dev/VolGroup00/LogVol01 -L +256M
3. Format the new swap space:
# mkswap /dev/VolGroup00/LogVol01
4. Enable the extended logical volume:
# swapon -va
5. Test that the logical volume has been extended properly:
# cat /proc/swaps # free
1. Disable swapping for the associated logical volume:
# swapoff -v /dev/VolGroup00/LogVol01
2. Resize the LVM2 logical volume by 256 MB:
# lvm lvresize /dev/VolGroup00/LogVol01 -L +256M
3. Format the new swap space:
# mkswap /dev/VolGroup00/LogVol01
4. Enable the extended logical volume:
# swapon -va
5. Test that the logical volume has been extended properly:
# cat /proc/swaps # free
Thursday, June 11, 2009
Linux to help animals
Active Media Products just released the perfect gift for Linux nerds young and old.
The actual product wasn't made with Linux users in mind. Active Media teamed up with the WWF ( World Wildlife Fund) to make a bunch of USB drives themed after endangered animals. A portion of the proceeds from sales will go to the WWF to help stop cute animals such as Penguin from dying out.
There are four different versions of the Penguin USB drive available; 2GB, 4GB, 8GB, and 16GB versions. The 8GB version will retail for around $26 dollars, and all versions are available right now from Amazon.com and other retailers.

The actual product wasn't made with Linux users in mind. Active Media teamed up with the WWF ( World Wildlife Fund) to make a bunch of USB drives themed after endangered animals. A portion of the proceeds from sales will go to the WWF to help stop cute animals such as Penguin from dying out.
There are four different versions of the Penguin USB drive available; 2GB, 4GB, 8GB, and 16GB versions. The 8GB version will retail for around $26 dollars, and all versions are available right now from Amazon.com and other retailers.
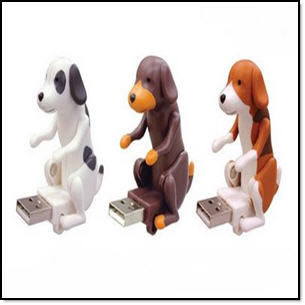
Dog style shape of USB pen drive.
penguin shape of USB pen drive.
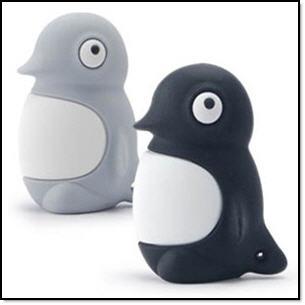

Multi-penguin shape of USB pen drive.
Teddy bear shape of USB pen drive.

Subscribe to:
Posts (Atom)


 Posts
Posts


